
There is a specific moment on a shoot that I never enjoyed. The light is doing something interesting and about to stop doing it, and instead of looking at the scene I am staring at a meter counting stops in my head. Read the shadow, place it, check the highlight, work out the spread, decide whether this roll is going to be a normal development or something flatter. By the time I had the numbers, the light had usually moved on.
I shoot 35mm, a Leica MP with a 50mm Summicron and mostly Kodak Tri-X, and I meter by the Zone System. That last part usually gets a raised eyebrow, because the Zone System was built around large format, where you expose and develop one sheet at a time. On a rangefinder loaded with a 36 exposure roll you cannot do that. So this piece is partly about how the Zone System still earns its place on a Leica, and partly about the thing nobody romanticises: the arithmetic, and how doing it badly for years pushed me to build a small tool so I could stop doing it in my head.
How I actually place zones
The core of the method is one sentence: expose for the shadows, develop for the highlights. In the field, with the camera at my eye, that becomes:
Meter the darkest part of the scene where I still want texture. A meter reads everything as middle grey, which is Zone V. If I used that reading directly, my textured shadow would sit on Zone V and look far too bright.
Decide which zone that shadow belongs on. For a textured shadow I usually want Zone III, two stops darker than the meter says, so I close down two stops from the reading. That is the placement.
Meter the brightest important highlight and see where it falls. If the shadow is on Zone III and the highlight lands on Zone VII or VIII, that is a normal range. If it runs up to Zone IX or X, I know the negative will be contrasty and I will have to deal with it, either at development or later under the enlarger.
None of that is hard on paper. The difficulty is that every step is stop counting, and stop counting while the light changes is exactly where mistakes happen. Placing a shadow one zone off is a full stop of underexposure on a frame I usually only get one chance at.
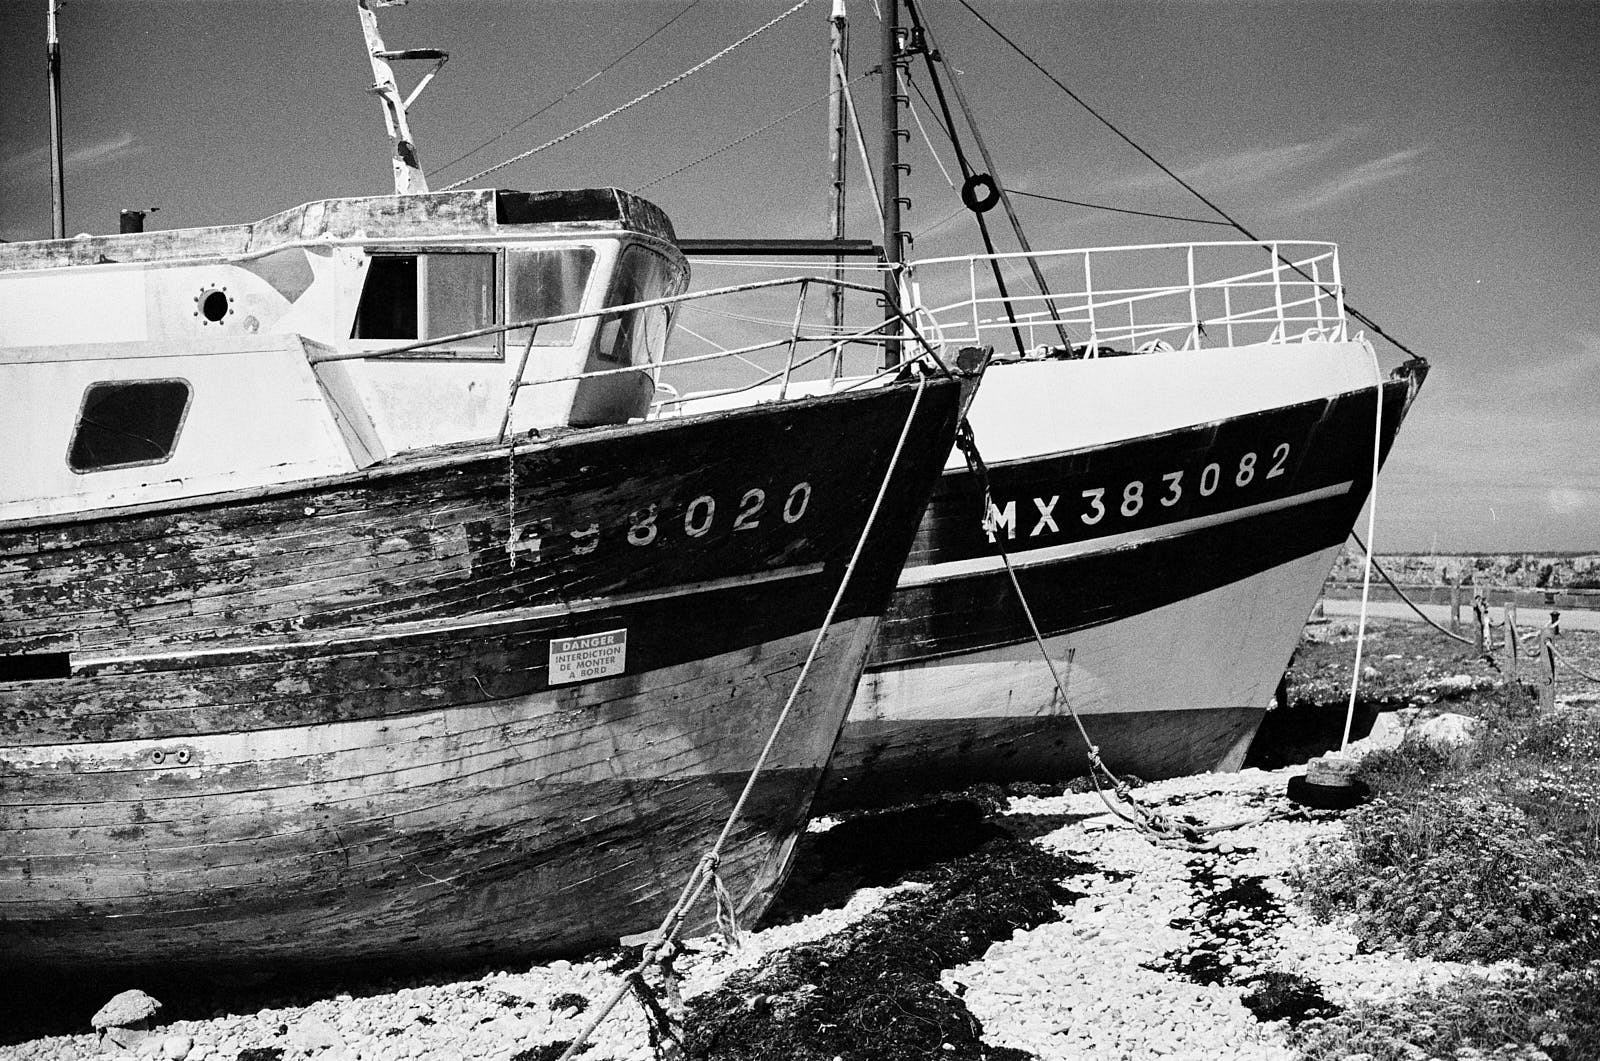
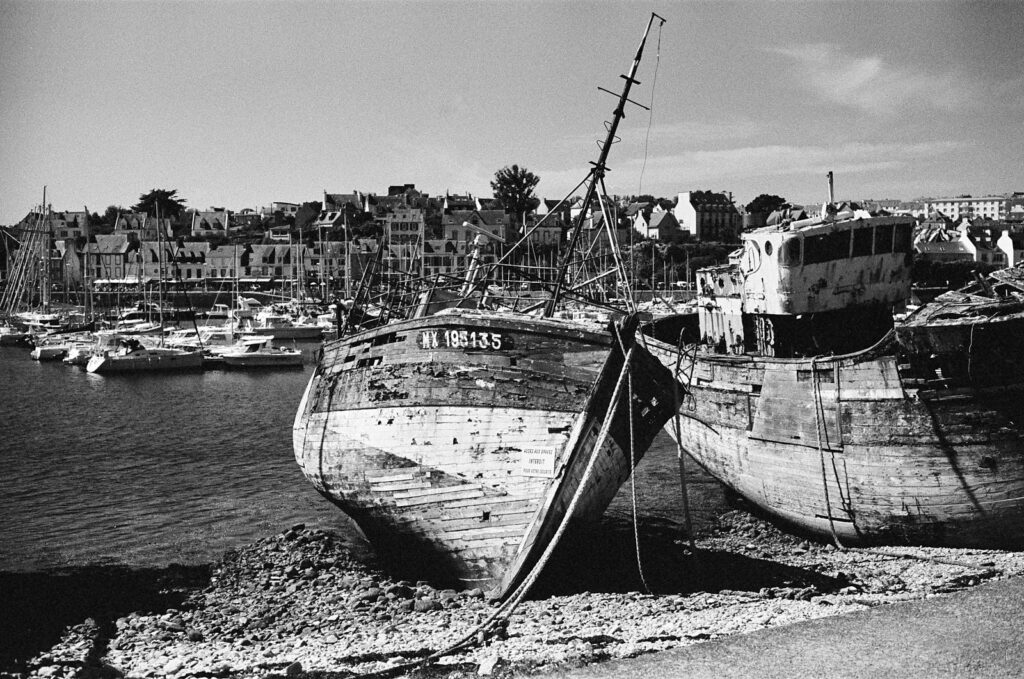
The two boats below are the honest example. Hard Breton sun, black tarred planks against a white hull and a bright sky. Meter the dark planks, drop them onto Zone III so they keep their grain and texture instead of blocking up, then check that the white hull and sky do not run off the top of the scale. Tri-X has enough latitude to hold both if the shadow is placed properly. Get the placement wrong and either the planks go to mud or the hull goes to paper white.
The catch nobody mentions: you develop the whole roll at once
Here is where 35mm breaks the classical Zone System, and where most articles quietly stop. On a 4×5 sheet you can give this negative a contraction and the next one an expansion. On a roll, all 36 frames get one development. You do not get to rate this frame N and that frame N minus one.
So on the Leica the Zone System stops being an exposure and development system and becomes, mostly, an exposure discipline. The placement still does the important work: it guarantees printable shadows on every frame, which is the half of the negative you cannot fix later. The contrast half moves to two other places. First, a decision made for the whole roll: if I know I am shooting a high contrast subject all day, hard coastal light on white boats and pale stone, I will meter and develop the roll a touch softer across the board. Second, the print or the scan, where a contrasty negative is a grade of paper or a curve adjustment, not a lost frame.
That sounds like a compromise, and it is, but it is a good one. The part of the Zone System that matters most on 35mm is the part you cannot recover in post: getting the shadow on the right zone. Everything above middle grey, Tri-X and a decent print will forgive. Everything below it, you have to get right in the camera.
The reciprocity non-problem, for once
Reciprocity failure is the classic Zone System worry, the thing that catches out long exposures on a tripod, where the film stops responding linearly and a metered two seconds really wants four. Handheld on the Leica in Breton daylight it barely exists. The shutter speeds are short, the film stays linear, and that is genuinely one less thing to juggle. Worth saying out loud, because a lot of Zone System writing treats reciprocity as ever present when for most 35mm shooting in daylight it simply is not.
Development time still has to be your own
Placement gets you the exposure. It does not get you the negative. Whatever contrast intention you settled on for the roll still has to become an actual development time for your specific film, developer, dilution and temperature. Published starting times are a reasonable guess. The times that actually work are the ones you tested yourself, wrote on a card, and lost twice.
I shoot Tri-X at EI 320 and develop it in Rodinal, diluted 1:50, at 20 °C in an ARS-Imago Labbox. My tested normal time is around 13 minutes, and it took a couple of ruined rolls before I trusted it.
Why I built a tool instead of buying more index cards
For a long time I did this the honest analogue way: a notebook, a laminated card of tested times, and a lot of recounting. It works. It also kept pulling my attention out of the scene and into the maths, which is the opposite of why I carry a Leica in the first place. The whole appeal of the camera is that it disappears. The metering was the last thing that did not.
Being a software developer during the week, I did the obvious thing and built the calculator I wished I had. It was narrow on purpose. Not a light meter replacement, not an exposure database. I just wanted the stop counting to disappear, so that placing a shadow on Zone III was one deliberate decision and not a sum. Read the meter, tell it the zone I am placing on, let it carry the arithmetic and the jump from a contrast intention to a development time.
That tool eventually became an app called ZoneCalc. I am naming it here because it is the honest end of this story and because Hamish knows it is the reason I got in touch. But the article is not about the app. It is about the fact that the Zone System is a beautifully logical framework wrapped around tedious mental arithmetic, and the arithmetic is where good exposures quietly go wrong, whatever camera you use it on.
What I got wrong, and would tell my earlier self
Placement errors dwarf development errors. Getting the shadow on the right zone matters far more than a perfectly tuned time, and on roll film it matters even more, because placement is the part you cannot fix for a single frame afterwards.
On 35mm, decide the roll, not the frame. Stop trying to zone each exposure for its own development. Place every shadow properly, pick one contrast intention for the roll, and let the print carry the rest.
Test your own times. Published numbers get you close. Your numbers, for your film, developer and thermometer, are the ones worth trusting. A tool can do the arithmetic, it cannot test your combo for you.
Keep the maths out of the moment. Notebook, card or app, the goal is the same: make the decision about light, let something else count the stops. The fewer sums you do with the camera at your eye, the better your negatives get.
If any of this sounds familiar, the calculation part of ZoneCalc, placing a zone and getting a Zone V exposure, is free, so you can hold it next to your own method and see whether it saves you the same overhead it saved me. Or ignore the app entirely and take the field method above. That part costs nothing either, and it is the part that actually made my negatives better.
Jürgen Suk shoots 35mm film on a Leica MP and, on the side, builds small iOS tools for photographers. ZoneCalc is on the App Store.
Share this post:

Comments
Dann in Indonesia on The Zone System on a Leica, without the mental arithmetic
Comment posted: 25/07/2026
I use my cameras as P&S - point and shoot - machines. Set on A and at my preferred f/stop for whatever scene(s) am photographing and that's it.
The only adjustments I bother with are (1) exposure compensation, and even here only -0.3 or +0.3 to deal with whatever lighting situation I am in at the time, and (2) if the scene is especially important, multiple exposure - in this latter case I set my Nikons for -0.3, 0.0 and +0.3. ME is particularly valuable in the harsh tropical light I usually photograph in, when I have to try to keep my shadows from going to deep black or my highlights from bleaching out everything.
By doing this I have long been spared too much overthinking about all these matters, and I am entirely free to concentrate on the scene.
Best from DANN in Indonesia.
Comment posted: 25/07/2026
Jeffery Luhn on The Zone System on a Leica, without the mental arithmetic
Comment posted: 25/07/2026
I'll check out your app. Thanks! Your shots look great. Nice long scale.
I'll relate a short story: When I was 16, I took a week long workshop in Yosemite with Ansel Adams. I had a very basic wooden 4x5 camera and very little experience, although I had 'The Negative' book with me for him to autograph. He spent a couple lectures on zone system, of course, but also described a simpler method for roll film: Bracket, bracket, bracket. If the scene is really important, spend five frames to bracket. If altered development is required on high contrast scenes, split the (120) roll in half and process the pieces separately. Nobody dared to bring a 35mm camera to the workshop, but the simplified method works even better because you can divide the roll into thirds or even quarters. I am still amazed that Mr. Adams was flexible on zone system approaches.
Comment posted: 25/07/2026
Gary Smith on The Zone System on a Leica, without the mental arithmetic
Comment posted: 25/07/2026
I would say that your system is working very well. Your included examples look perfectly exposed to me. I'll admit to also having landed on the same answer as Dann (above) has: camera in aperture priority set on my preferred aperture for the lens being used and let the camera do the rest. Of course this only works with some of my cameras which is likely why my results can be all over the place depending what camera I've got in hand at the moment.
Thanks for your article!
Comment posted: 25/07/2026
Skordisk on The Zone System on a Leica, without the mental arithmetic
Comment posted: 25/07/2026
1. Overexposure for 1 stop, a constant one + underdevelopment for 30 pct or about.
With the above, a wider range is obtained on the film. Roughly, on a quality emulsion, 1/2 stop on both sides of the latitude (half of a zone on each side), i.e. one full stop. A more flattened curve. Why do we need to follow and believe in declared sensibility of films?! Besides, Rodinal is not a compensating developer.
2. Additionaly, use of filters. Yellow, yellow-green, green - these ones for lightening or darkening of some areas, of some 'layers". I am not mentioning contrast pushing filters here, because these couldn't work in these scenes.
Comment posted: 25/07/2026
Comment posted: 25/07/2026
David Pauley on The Zone System on a Leica, without the mental arithmetic
Comment posted: 25/07/2026
Thanks for this piece and for the lovely photos. Although I do shoot large format I was never committed to the Zone system until I started using manual strobe on a more regular basis with medium and large format cameras. It's incredibly important and helpful there as a reliable way of placing highlights and shadows where one wants them and not ending up with unhappy surprises. It's good to be reminded of its uses in landscape, which of course is the genre for which it began.
Comment posted: 25/07/2026
Luc Noël on The Zone System on a Leica, without the mental arithmetic
Comment posted: 26/07/2026
Thank you for your contribution, which I find very interesting, as I also use a Leica M.
As this isn’t specifically mentioned in your article, I’d like to ask you how you measure the light in the shadowed areas. Do you use a spotmeter?
Thank you.
Luc
Comment posted: 26/07/2026
Geoff Chaplin on The Zone System on a Leica, without the mental arithmetic
Comment posted: 26/07/2026
Comment posted: 26/07/2026
Ed on The Zone System on a Leica, without the mental arithmetic
Comment posted: 27/07/2026
Comment posted: 27/07/2026
CHRISTOF RAMPITSCH on The Zone System on a Leica, without the mental arithmetic
Comment posted: 27/07/2026
Comment posted: 27/07/2026